In questo articolo vedremo come realizzare una semplice stazione meteo con Arduino.
Il progetto è stato presentato come tesina all'esame di maturità a.s. 2017/18 dallo studente di Informatica Alex Toto dell' ITI E. Majorana di Grugliasco (TO)
I dati acquisiti ogni 5 sec. dai sensori mediante una scheda Arduino Uno verranno inviata ad un web server dove uno script PHP provvederà a memorizzarli su un database MySQL.
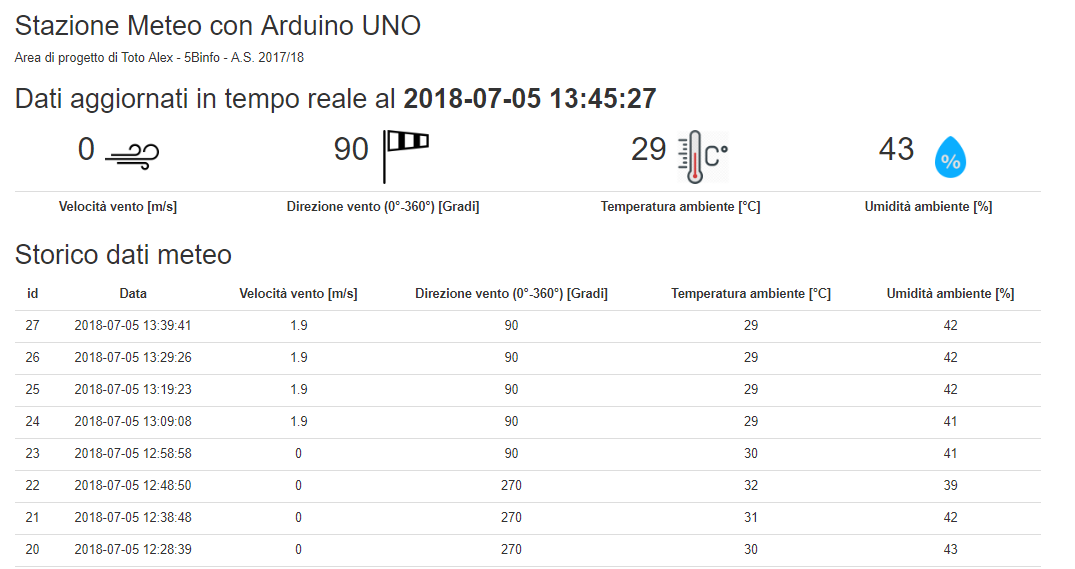
Una pagina WEB permetterà poi di visualizzare sul browser sia i dati in tempo reale che lo storico delle acquisizioni.

Il sistema è composto da:
- Un sensore di temperatura e umidità digitale tipo DHT11

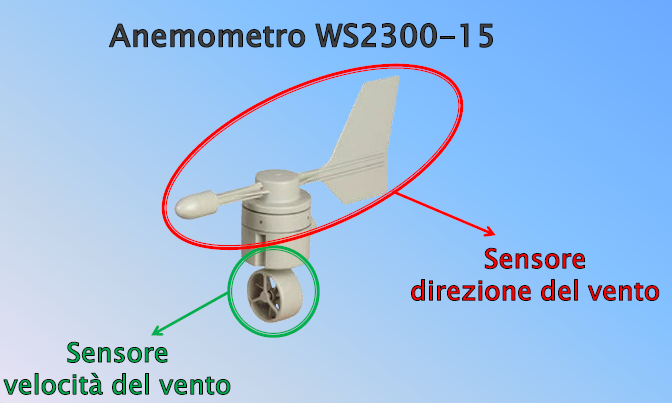
- Un sensore di velocità e direzione del vento: Anemometro WS2300-15 (img + scheda dati)
- Una scheda Arduino Uno rev. 3
- Una shield WiFi Arduino (per connessione Internet a web server)
- Una scheda custom per circuiti necessari all' Anemometro, al DHT11 e connettori vari.
- Un Server web con PHP e MySQL (sito gratuito su altervista.org)

Le tre schede del sistema impilate: la scheda custom, lo shield WiFi, Arduino Uno

Particolare della scheda custom
Il codice per Arduino ottenuto modificando il programma "Repeating Wifi Web Client" che si trova negli esempi della WiFi:
/*
  Repeating Wifi Web Client

 This sketch connects to a a web server and makes a request
 using an Arduino Wifi shield.

 Circuit:
 * WiFi shield attached to pins SPI pins and pin 7

 created 23 April 2012
 modified 31 May 2012
 by Tom Igoe
 modified 13 Jan 2014
 by Federico Vanzati

 http://www.arduino.cc/en/Tutorial/WifiWebClientRepeating
 This code is in the public domain.
 */
/* Modificato il 25/05/2018 per progetto STAZIONE METEO
 *  by TOTO Alex e MAIDA Vincenzo
 */
#include <SPI.h>
#include <WiFi.h>

//Impostazioni per sensore di Umidità/Temperatura DHT11
#include <DHT.h>
#define DHTPIN 5 // 5 è il pin di Arduino a cui collego il sensore DHT11 (porta OUT, ossia la porta dati)
#define DHTTYPE DHT11 // dht11 è il tipo di sensore utilizzato
DHT dht(DHTPIN, DHTTYPE);

//Anemometro SW2003-15
int pinTX = 6;
int pinEN = 8;

//DHT11
int pinData = 5;

//Variabili per meteo
int dati[30];   //Vettore per acquisizione di 30 campioni da Anemometro
float vv=20.2; //Velocità vento in m/s
int dv=180;    //Direzione vento in Gradi
float t=28.5;  //Temperatura in °C
int u=70;     //Umidità in %
String query="GET /salva_meteo1.php?vv="+String(vv,DEC)+"&dv="+String(dv,DEC)+"&t="+String(t,DEC)+"&u="+String(u,DEC)+" HTTP/1.1";

char ssid[] = "AndroidAP";      //  your network SSID (name)
char pass[] = "prova2018";   // your network password
int keyIndex = 0;            // your network key Index number (needed only for WEP)

int status = WL_IDLE_STATUS;

// Initialize the Wifi client library
WiFiClient client;

// server address:
char server[] = "itismajo.altervista.org";
//IPAddress server(64,131,82,241);

unsigned long lastConnectionTime = 0;            // last time you connected to the server, in milliseconds
const unsigned long postingInterval = 10L * 1000L; // delay between updates, in milliseconds.

void setup() {

  pinMode(pinData,INPUT);
  pinMode(pinTX,INPUT);
  pinMode(pinEN,OUTPUT);
  digitalWrite(pinEN,LOW);

  //Initialize serial and wait for port to open:
  Serial.begin(9600);
  while (!Serial) {
    ; // wait for serial port to connect. Needed for native USB port only
  }

  // check for the presence of the shield:
  if (WiFi.status() == WL_NO_SHIELD) {
    Serial.println("WiFi shield not present");
    // don't continue:
    while (true);
  }

  String fv = WiFi.firmwareVersion();
  if (fv != "1.1.0") {
    Serial.println("Please upgrade the firmware");
  }

  // attempt to connect to Wifi network:
  while (status != WL_CONNECTED) {
    Serial.print("Attempting to connect to SSID: ");
    Serial.println(ssid);
    // Connect to WPA/WPA2 network. Change this line if using open or WEP network:
    status = WiFi.begin(ssid, pass);

    // wait 10 seconds for connection:
    delay(10000);
  }
  // you're connected now, so print out the status:
  printWifiStatus();
}

void loop() {
  // if there's incoming data from the net connection.
  // send it out the serial port.  This is for debugging
  // purposes only:
  while (client.available()) {
    char c = client.read();
    Serial.write(c);
  }

  // if ten seconds have passed since your last connection,
  // then connect again and send data:
  if (millis() - lastConnectionTime > postingInterval) {
    httpRequest();
  }

}

/*******************************
 * *** INIZIO SOTTOPROGRAMMI ***
 ******************************/
// this method makes a HTTP connection to the server:
void httpRequest() {
  // close any connection before send a new request.
  // This will free the socket on the WiFi shield
  client.stop();

  // if there's a successful connection:
  if (client.connect(server, 80)) {
    acquisizioneDati();
    query="GET /salva_meteo1.php?vv="+String(vv,DEC)+"&dv="+String(dv,DEC)+"&t="+String(t,DEC)+"&u="+String(u,DEC)+" HTTP/1.1";

    stampa();
    // send the HTTP PUT request:
    //client.println("GET /latest.txt HTTP/1.1");
    client.println(query);
    client.println("Host: itismajo.altervista.org");
    client.println("User-Agent: ArduinoWiFi/1.1");
    client.println("Connection: close");
    client.println();

    // note the time that the connection was made:
    lastConnectionTime = millis();
  } else {
    // if you couldn't make a connection:
    Serial.println("connection failed");
  }
}


void printWifiStatus() {
  // print the SSID of the network you're attached to:
  Serial.print("SSID: ");
  Serial.println(WiFi.SSID());

  // print your WiFi shield's IP address:
  IPAddress ip = WiFi.localIP();
  Serial.print("IP Address: ");
  Serial.println(ip);

  // print the received signal strength:
  long rssi = WiFi.RSSI();
  Serial.print("signal strength (RSSI):");
  Serial.print(rssi);
  Serial.println(" dBm");
}


void acquisizioneDati(){
int i;
//Acquisizione dati anemometro
digitalWrite(pinEN,LOW);
while(digitalRead(pinTX)==HIGH){
    //Attendi
  }
  delayMicroseconds(625);
  for(i=0; i<30; i++){
    dati[i]=digitalRead(pinTX);
    delayMicroseconds(1250);
  }
digitalWrite(pinEN,HIGH);
dv=bintodec(5,8) * 22.5; //Convertito in gradi
vv=bintodec(9,20) * 0.1; //Convertito in m/s


//DHT11
t = dht.readTemperature();
u = dht.readHumidity();
}


int bintodec(int inizio,int fine){
  int i=0;
  int d=0; //numero in decimale
  int e=1; //equivale a 2^0

  for(i=inizio;i<=fine; i++){
    d=d+dati[i]*e;
    e=e*2;
  }
  return d;
}


void stampa(){
  int i;
  //Dati anemometro
  Serial.println("Acquisizione dati Anemometro");
 Serial.println("Direzione Vento (4 bit) indice da 5 a 8  dove 5=LSB e 8=MSB. Dato binario da leggere da destra verso sinistra:");
 for(i=5;i<=8;i++){
 Serial.print(dati[i]);
 Serial.print(" ");
}
//Serial.println();
 Serial.print(" = ");
Serial.print(bintodec(5,8));
Serial.print(" DEC  in gradi--> ");
Serial.println(bintodec(5,8)*22.5);

Serial.println("Velocità Vento (12 bit) indice da 9 a 20 dove 9=LSB e 12=MSB. Dato binario da leggere da destra verso sinistra:");
for(i=9;i<=20;i++){
 Serial.print(dati[i]);
 Serial.print(" ");
}
Serial.print(" = ");
Serial.print(bintodec(9,20));

Serial.print(" DEC  in m/s--> ");
Serial.println(bintodec(9,20)*0.1);


//Dati DHT11
Serial.println("Acquisizione dati DHT11");
Serial.print("Temperatura [°C]: ");
Serial.print(t);
Serial.println("°C");
//delay(1000);

Serial.print("Umidita' [%]: ");
Serial.print(u);
Serial.println("%");

//Invio Dati al server
Serial.println("connecting...");
Serial.print("query= ");
Serial.println(query);
}
Il database MySQL (my_itismajo) contiene due tabelle: meteo e meteo_real_time
La tabella METEO è così organizzata:
| # | Nome | Tipo | Codifica caratteri | Attributi | Null | Predefinito | Commenti | Extra |
|---|---|---|---|---|---|---|---|---|
| 1 | int(11) | No | Nessuno | AUTO_INCREMENT | ||||
| 2 | timestamp | No | CURRENT_TIMESTAMP | |||||
| 3 | float | No | Nessuno | in m/s | ||||
| 4 | int(11) | No | Nessuno | in gradi da 0 a 360 | ||||
| 5 | float | No | Nessuno | [°C] | ||||
| 6 | int(11) | No | 0 |
La tabella METEO_REAL_TIME ha identica struttura ma conterrà un solo record e verrà aggiornato da Arduino ogni 5 secondi.
Lo script PHP "salva_meteo1.php" chiamato da Arduino sul server all'indirizzo itismajo.altervista.org si occupa di aggiornare le due tabelle.
Ogni 5 secondi aggiorna la tabella METEO_REAL_TIME (update) ed ogni 10 minuti aggiunge un nuovo record alla tabella METEO (insert)
<?php

/* * ****************************************************************
 * Salva_meteo1.php
 * 1. Riceve dati meteo ogni 5 secondi e li memorizza (update) nel record 1 della tabella METEO_REAL_TIME
 * 2. Controlla la data dell'ultimo dato meteo inserito nella tabella METEO e se c'è una differenza >= a 10 minuti
 * col dato in tempo reale aggiunge quest'ultimo come nuovo record alla tabella METEO (storico)
 */

function getData($tabella){
 $mysqli = @new mysqli("localhost", "root", "", "my_itismajo");
 if ($mysqli->connect_errno) {
 die( "Errore di connessione a MySQL: (" . $mysqli->connect_errno . ") " . $mysqli->connect_error);
 }
 $sql = "SELECT data FROM $tabella ORDER BY id DESC LIMIT 1";
 $result = $mysqli->query($sql);
 if (!$result) {
 die('Query Errata: ' .$mysqli->error);
 }
 $row = $result->fetch_array(MYSQLI_ASSOC);
 return $row['data'];

}
function update() {
 //1. Recupera dati dal form
 $velocita_vento = $_GET["vv"];
 $direzione_vento = $_GET["dv"];
 $temperatura = $_GET["t"];
 $umidita = $_GET["u"];
 //Validazione dati (VUOTO)
 //Inserimento dati nel database: tabella meteo
 //Connessione al database
 $mysqli = @new mysqli("localhost", "root", "", "my_itismajo");
 if ($mysqli->connect_errno) {
 die( "Errore di connessione a MySQL: (" . $mysqli->connect_errno . ") " . $mysqli->connect_error);
 }
 $data= date("Y-m-d H:i:s");
 $sql = "UPDATE meteo_real_time SET data='$data', velocita_vento = $velocita_vento, direzione_vento=$direzione_vento, temperatura = $temperatura, umidita = $umidita WHERE id=1";
 $result = $mysqli->query($sql);
 if (!$result) {
 die('Query Errata: ' .$mysqli->error);
 }
 If ($result == false) {
 print "<h1>Errore inserimento dati meteo nella query $sql -" . $mysqli->error . "</h1>\n";
 //print "<a href=\"javascript:history.back()\">Ritorna al form.</a>";
 exit;
 } else
 return "<h2>Dati REAL TIME aggiornati correttamente.</h2>";
} //Fine UPDATE

function insert(){
 //1. Recupera dati dal form
 $velocita_vento = $_GET["vv"];
 $direzione_vento = $_GET["dv"];
 $temperatura = $_GET["t"];
 $umidita = $_GET["u"];
 //Validazione dati (VUOTO)
 //Inserimento dati nel database: tabella meteo
 //Connessione al database
 $mysqli = @new mysqli("localhost", "root", "", "my_itismajo");
 if ($mysqli->connect_errno) {
 die( "Errore di connessione a MySQL: (" . $mysqli->connect_errno . ") " . $mysqli->connect_error);
 }
 $sql="INSERT INTO meteo(velocita_vento, direzione_vento,temperatura,umidita) VALUES ($velocita_vento,$direzione_vento,$temperatura,$umidita)";
 $result = $mysqli->query($sql);
 if (!$result) {
 die('Query Errata: ' .$mysqli->error);
 }
 If ($result == false) {
 print "<h1>Errore inserimento dati meteo nella query $sql -" . $mysqli->error . "</h1>\n";
 //print "<a href=\"javascript:history.back()\">Ritorna al form.</a>";
 exit;
 } else
 return "<h2>Dati METEO STORICO inseriti correttamente.</h2>";
}

//**** MAIN ********
$msg = new stdClass();
//$myObj->localTime = 5;


//$msg="";
$msg->update=update();
$data1=getData("meteo");
$data1sec= strtotime($data1);
//var_dump($data1);
$msg->storico="-Data Storico: ".$data1;
$data2=getData("meteo_real_time");
$data2sec= strtotime($data2);
$msg->dataRT="-Data Real Time: ".$data2;
$msg->differenza="Differenza in sec.: ".($data2sec-$data1sec);
if (($data2sec-$data1sec)>=(10*60)){
 $msg->insert= insert();
}
//print $msg;
$myJSON = json_encode($msg);
echo $myJSON;
?>
Per visualizzare i dati presenti nel database la pagina da chiamare è : http://itismajo.altervista.org/meteo1.php

Lo script visualizza sia l'ultimo dato in tempo reale (prelevandolo dalla tabella METEO_REAL_TIME) che lo storico di tutti i dati memorizzati nella tabella METEO.
Il codice della pagina meteo1.php
<?php
include "config.php"; //Dati di connessione al database
$sql = "SELECT * FROM meteo ORDER BY id DESC";
$result = $mysqli->query($sql);
If ($result == false) {
 print "<h1>Errore inserimento dati meteo nella query $sql -" . $mysqli->error . "</h1>\n";
 //print "<a href=\"javascript:history.back()\">Ritorna al form.</a>";
 exit;
}
$html="";
while ($row = $result->fetch_array(MYSQLI_ASSOC)) {
 $html.="<tr><td class='text-center'>".implode("</td><td class='text-center'>", $row)."</td></tr>\n";
}
?>
<!DOCTYPE html>
<html lang="en">
 <head>
 <title>Stazione Meteo</title>
 <meta charset="utf-8">
 <meta name="viewport" content="width=device-width, initial-scale=1">
 <!-- Latest compiled and minified CSS -->
 <link rel="stylesheet" href="https://maxcdn.bootstrapcdn.com/bootstrap/3.3.7/css/bootstrap.min.css">

 <!-- jQuery library -->
 <script src="https://ajax.googleapis.com/ajax/libs/jquery/3.3.1/jquery.min.js"></script>

 <!-- Latest compiled JavaScript -->
 <script src="https://maxcdn.bootstrapcdn.com/bootstrap/3.3.7/js/bootstrap.min.js"></script>
 </head>
 <body>

 <div class="container">
 <h2>Stazione Meteo con Arduino UNO</h2>
 <p>Area di progetto di Toto Alex - 5Binfo - A.S. 2017/18</p>
 <h2>Dati aggiornati in tempo reale al <strong id="dataRT"></strong></h2>
 <p> </p>
 <table class="table table-hover">
 <thead>
 <tr>
 <th class="text-center"><strong id="pb_1" class="h1"></strong><img src="https://encrypted-tbn0.gstatic.com/images?q=tbn:ANd9GcQqOZ3D82xYp0_8ykoaZAWGJPUTwxUJs8O44s7N_QUW3Q0WZBxT" width="60" height="60"></th>
 <th class="text-center"><strong id="pb_2" class="h1"></strong><img src="https://image.flaticon.com/icons/png/128/55/55971.png" width="60" height="60"></th>
 <th class="text-center"><strong id="pb_3" class="h1"></strong><img src="https://www.dolomiti.it/fileadmin/meteo/meteo_icone/temperatura.png" width="60" height="60"></th>
 <th class="text-center"><strong id="pb_4" class="h1"></strong><img src="https://cdn4.iconfinder.com/data/icons/the-weather-is-nice-today/64/weather_44-128.png" width="60" height="60"></th>

 </tr>
 </thead>
 <tbody>
 <tr>
 <th class="text-center">Velocità vento [m/s]</th>
 <th class="text-center">Direzione vento (0°-360°) [Gradi]</th>
 <th class="text-center">Temperatura ambiente [°C]</th>
 <th class="text-center">Umidità ambiente [%]</th>
 </tr>
 </tbody>
 </table>
 <h2>Storico dati meteo</h2>
 <table class="table table-hover">
 <thead>


 <tr>
 <th class="text-center">id</th>
 <th class="text-center">Data</th>
 <th class="text-center">Velocità vento [m/s]</th>
 <th class="text-center">Direzione vento (0°-360°) [Gradi]</th>
 <th class="text-center">Temperatura ambiente [°C]</th>
 <th class="text-center">Umidità ambiente [%]</th>
 </tr>
 </thead>
 <tbody>
 <?php print $html; ?>
 </tbody>
 </table>
 </div>
 <script src="https://ajax.googleapis.com/ajax/libs/jquery/3.3.1/jquery.min.js"></script>
<script>
 change();
 var myVar = setInterval(change, 10000);
 // var myVar1 = setInterval(location.reload(true), 60*10);
 var perc = 0;

 function change() {
 //todo
 perc += 10;

 if (perc >= 620){
 perc = 0;
 location.reload(true);
 }
 $.get("legge_meteo_real_time.php",
 {

 },
 function(data,status){

 var obj=JSON.parse(data);
 $('#pb_1').html(obj.vv+" ");
 $('#pb_2').html(obj.dv+" ");
 $('#pb_3').html(obj.t+" ");
 $('#pb_4').html(obj.u+" ");
 $('#dataRT').html(obj.dataRT);

 /*alert("status: " + status +
 "\ndata: " + data
 ); */

 });
 //$('#pb_1').css('width', perc + '%');
 $('#pb_1').html(perc + '%');
 }
 </script>
 </body>
</html>
Lo script legge_meteo_real_time.php richiamato dalla pagina web mediante funzione JQuery $.get() per aggiornamento automatico dei dati reali ogni 10 secondi
<?php
include "config.php"; //Dati di connessione al database
$sql = "SELECT * FROM meteo_real_time";
$result = $mysqli->query($sql);
If ($result == false) {
 print "<h1>Errore inserimento dati meteo nella query $sql -" . $mysqli->error . "</h1>\n";
 //print "<a href=\"javascript:history.back()\">Ritorna al form.</a>";
 exit;
}
$msg = new stdClass();
$row = $result->fetch_array(MYSQLI_ASSOC);
$msg->vv=$row["velocita_vento"];
$msg->dv=$row["direzione_vento"];
$msg->t=$row["temperatura"];
$msg->u=$row["umidita"];
$msg->dataRT=$row["data"];
$myJSON = json_encode($msg);
echo $myJSON;
?>
Link utili e documentazione:
- Scheda custom (elenco componenti e foto per realizzazione)
- Documentazione Anemometro WS2300-15 e TX20 (molto simile al WS2300-15 ma con documentazione migliore! )


